
I've had a couple of requests to do a tutorial on how to make the clover flowers that I've added to my Just Be'cow'se card that I posted HERE.

So here goes. (Warning: this takes a lot of patience...hee hee.)
Supplies:
- Daisy flower dies/punches--small and medium. The one I used is this Crealies Creative Flowers No. 02 die set--the small daisy is 3/4" (2cm) in diameter and the medium daisy is 1/16" (3cm).

- Green cardstock
- Tim Holtz Distress Ink stamp pad Bundled Sage (or other green shade) and a dauber/dabber
- Spray bottle filled with tap water
- Molding mat
- Stylus to shape flowers (medium ball)
- Piercing tool
- Tweezer
- 1-Hole punches (1/4" and 1/16")
- Scissor
- Craft glue
Instructions:
Step 1
Diecut 4 medium and 1 small flowers from white cardstock. (This is for one clover flower only, so multiply that by the number of clover flowers you want.)

Step 2
Dab some green distress ink in the centre of each flower.

Step 3
Punch a hole in the centre of one of the medium flowers and a small hole in the centre of the small flower a shown.

Step 4
Spray some water over the flowers, just enough to dampen the paper. If they get too wet, just let them dry a bit.

Step 5
Every single petal needs to be folded upwards in half, yikes...yeah, I know...sorry. If you have small hands, you can probably use your thumb and finger to pinch the petals. This is the way I do it.
Place the flowers on your molding mat (a rubber mouse pad will do as well) and score down the middle of each petal with a piercing tool. Press firmly.

Step 6
Fold the petals. I use a tweezer to pinch them closed--again you can use your thumb and finger if you find this easier.

Step 7
Turn the flowers upside down. Cup each of the flower using a stylus (medium-size ball).

Step 8
Form the cups of the 4 medium flowers so they have varying degree of tightness as shown. The tighter ones will be more towards the centre of the clover flower. The one with the centre hole should have the widest spread--the least tight.
The small flower diecut is for the very bottom layer of the clover.
Let dry completely.

Step 9
With a small scissor, make a cut between any 2 of the petals...


Step 10
Glue the 4 medium flowers together.

Step 11
Cut a thin strip from green cardstock.

Step 12
Dab some glue at the centre of the small flower and insert the green strip through the hole from underneath as shown.
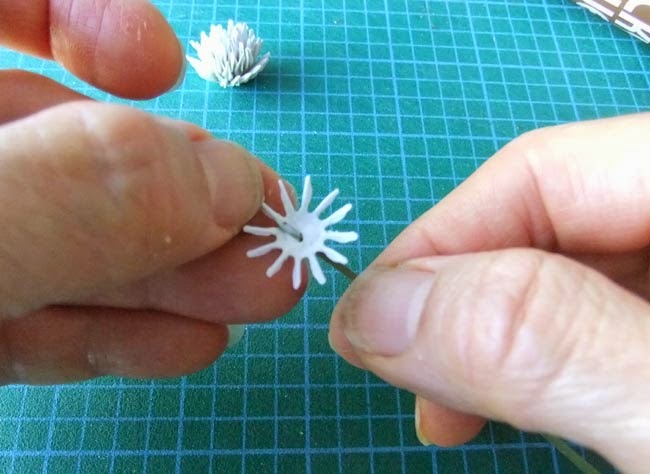
Step 13
Adhere to the bottom of the cluster of medium flowers.


There you go. Have fun!
I made this video also...
I forgot about the leaves...LOL. Here's how I made them.

Diecut from green cardstock--using Memory Box 98505 Norland Flower dies for the 3-leaf cluster and Heartfelt Creations Perfect Petals for the single leaf.
Draw some white markings with Sakura Gelly Roll White pen.
Smudge the white markings with a paper stump dipped in water.
And look here! I made a pink clover using pink cardstock instead of white.

That's it!

20 comments:
wow!
they're so beautiful!!!
thanks for the tutorial!!!
have a nice day :)
Thanks Norma for all your amazing tutorials. You are a big inspiration.
Hug Elin
Fabulous - thanks for sharing! Juliexx
Great tutorial, Norma! I love playing with my flower punches and dies to see what 3D florals I can make - it can be a bit fiddly, but ever so therapeutic and satisfying too! Thanks for sharing, hugs, Lisa x
They are brilliant Norma and your instructions look so clear! Thank you - Susan x
How beautiful Norma, a gorgeous card and a wonderful tut.
Hugs Jacee
Simply Paper Card Design
GORGEOUS!!!
Thanks for tutorial
hugs Tamara
These are lovely, Norma. I have this die set too so I'll have to give it a try. This card is one of my favs that you've done, even though there is no Tilda.
Have a wonderful weekend.
Hugz,
Cath
Fantastic tutorials and video, your such a creative lady, they are simply amazing! Thankyou so much for taking the time to do both amazing tutorials!
Cuddles Jay xxx
Just love this card Norma, it is one of my favourites. Your clover flowers are stunning!
hugs, Diana
heeel erg bedankt voor de uit leg hoe mooi u de bloemen kan maken..zit er schitterend uit uw bloemenpracht....
maar ben bang dat me dat niet gaat lukken...
groetjes manon
Norma, I want to thank you so much for the tutorials and everything you share.
I use this info to make some clover for a card, not as nice as yours but it worked. I linked you on my blog to the post.Hope you don't mind.
xoxo Nana
You did an awesome job on the video!! Great work!!
Thanks so much for the tutorial Norma, they are so effective, I will need lots of time to play I think, nicely done
Hugs Julie P
So gorgeous flowers, I love them! TSF
Wow so beautiful Norma! thanks
These are absolutely stunning! Thank you SO much for this great tutorial!
rewelacyjny kursik Dziękuję :)
Ale pięknie tu u Ciebie :-)
Thank you so much for the excellent video and posted instructions. They have helped me so much. Patricia xx
Post a Comment